- All passwords provided during mailbox creation are generic. Continued usage will pose a security threat. Please change the initial password upon receiving it to a personal, more secure one. (Please click on the "CHANGE YOUR EMAIL PASSWORD" tab to find instructions on how to change your email password).
- It is highly recommended that users who visit their mailbox externally (outside the confines of the WPCI Bentworth branch), change their password periodically once every 90 days (higher frequency of password change is encouraged).
- Bentworth location employees within the network are advised to change their password every 120 days (higher frequency of password change is encouraged).
- Do not click on suspicious links. Please have situational awareness when clicking on emails from unknown senders. (Further Reading: https://www.itgovernance.co.uk/blog/5-ways-to-detect-a-phishing-email).
- Do not provide email address settings details and/or passwords to anyone (even within the organization unless it is with the direct company IT contact).
- If you suspect your email address, or your self, have been involved in a targeted email attack, please inform the IT department immediately.
WPCI Email Instructions
Email Best Practices, Email Settings & Instructions
- Best Practices
- Web Access
- Mobile Access
- Outlook
- Email Password Change
- HT VAult
- SPAM FILTER
Please follow the instructions below to to access your WPCI email account through the web. The web Outlook version can be accessed on any web browser (including a mobile web browser).
- Visit https://mail.wpci.com
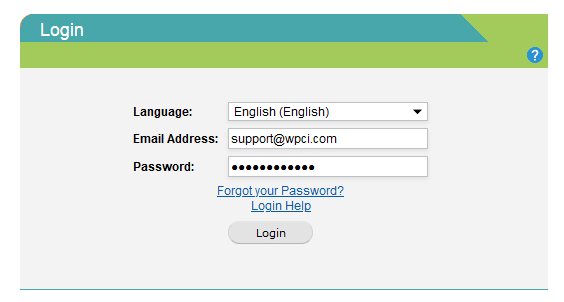
- Under "User name", enter your email user name. Your email user name will be the portion of your email address before @wpci.com (eg: the user name is highlighted here username@wpci.com)
- Under "Password", enter your email password.
- Click on "sign in".
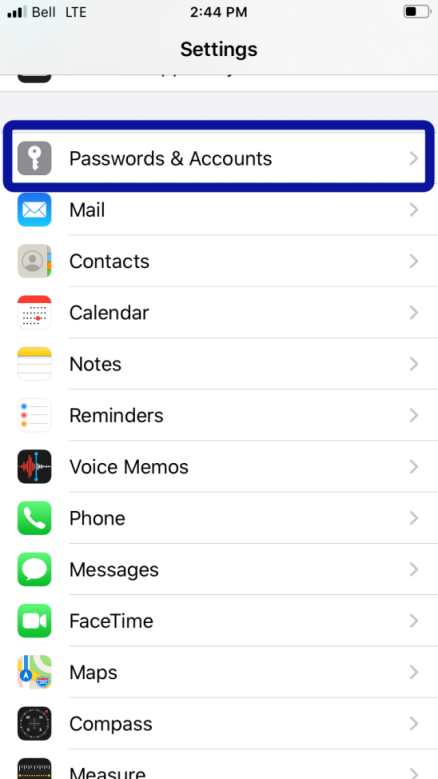
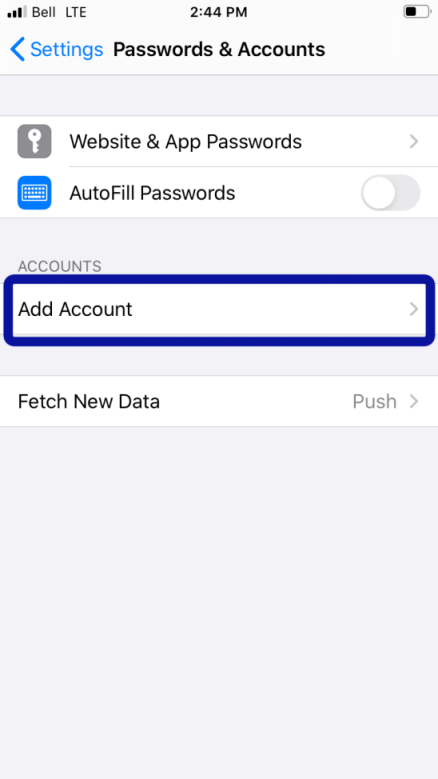
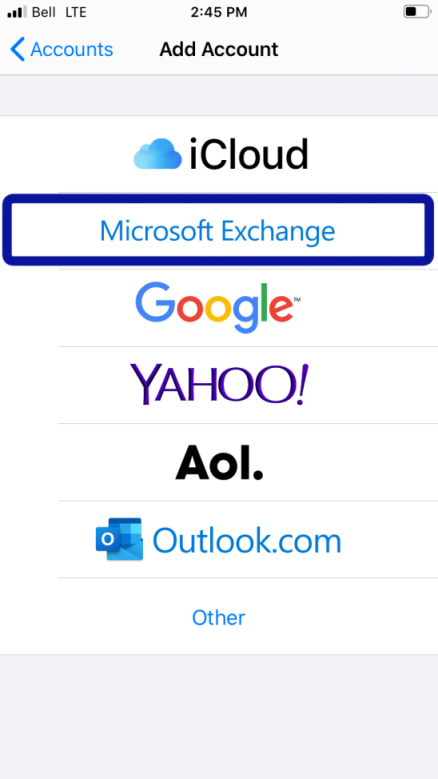
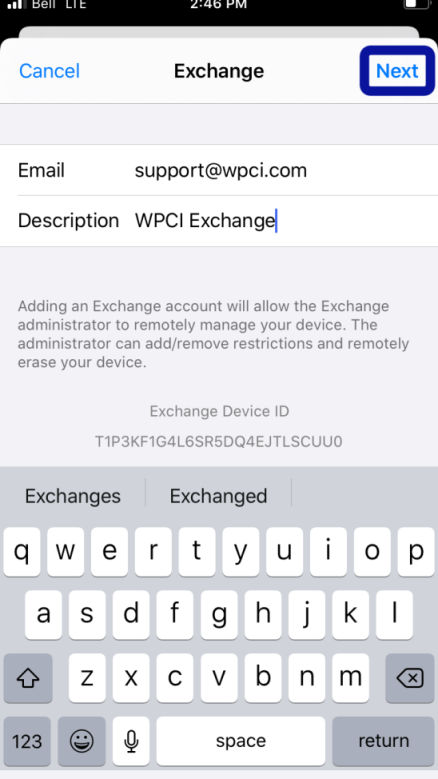
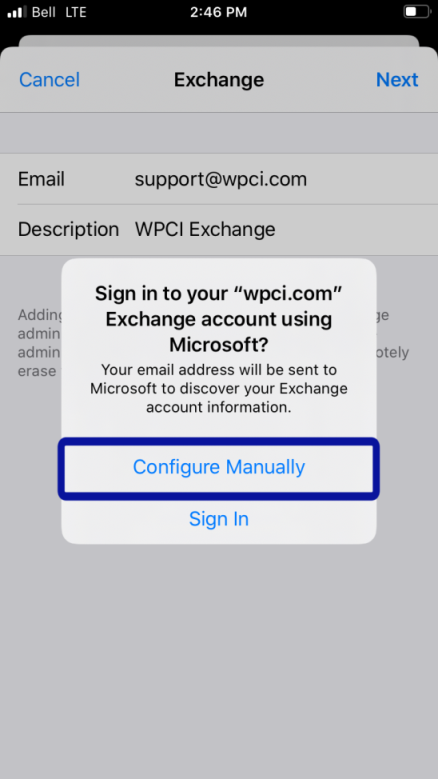
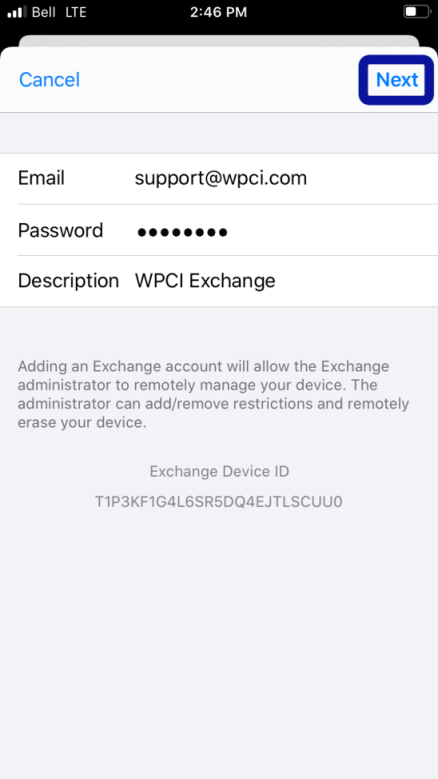
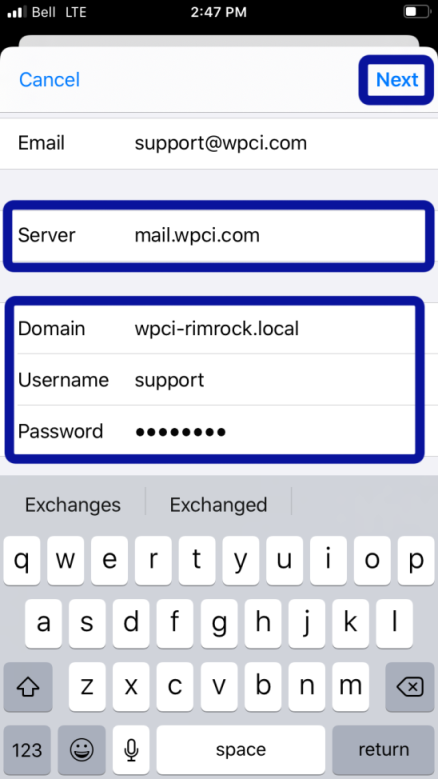
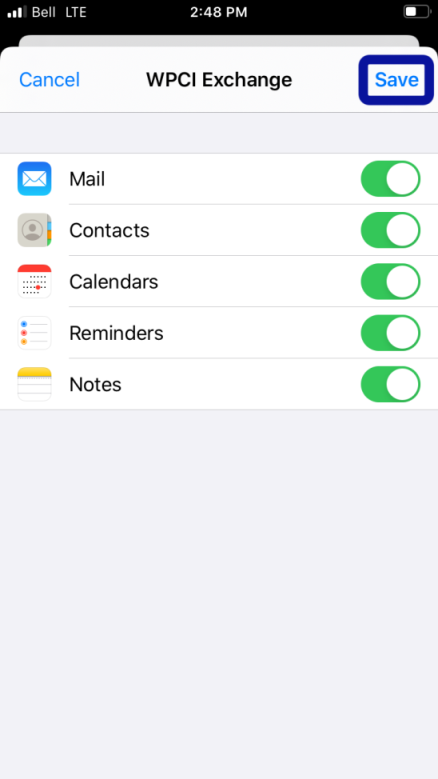
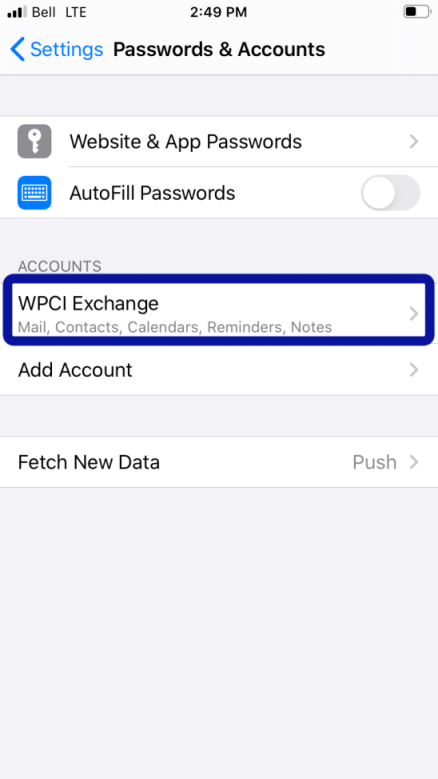
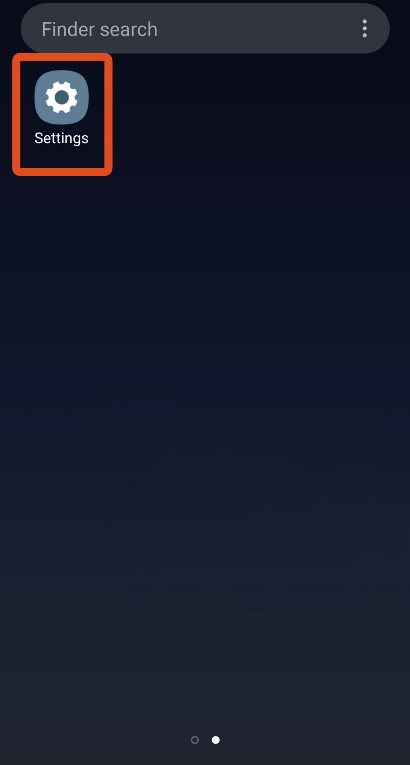
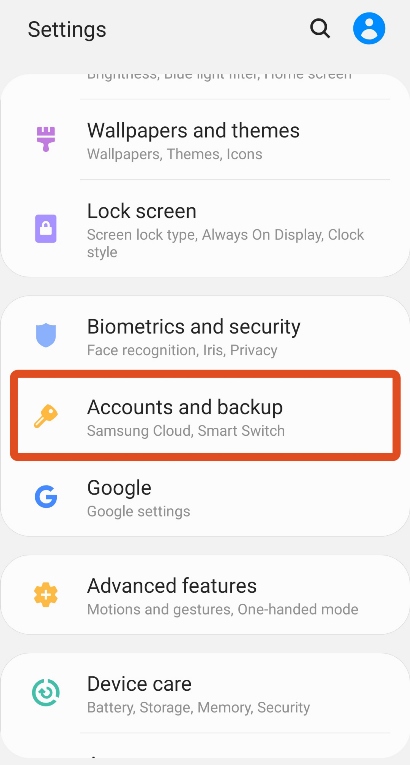
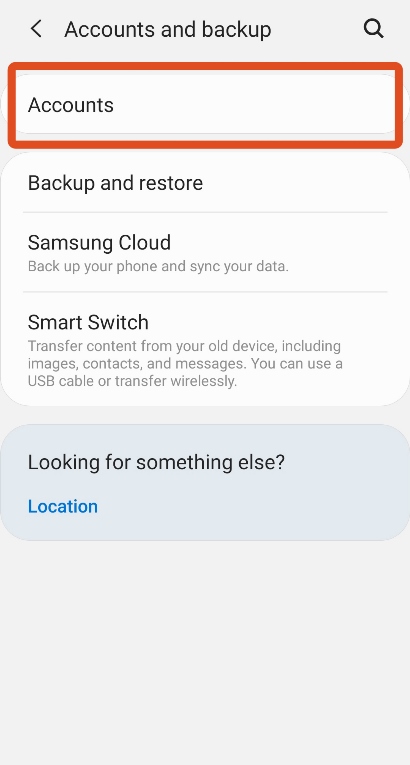
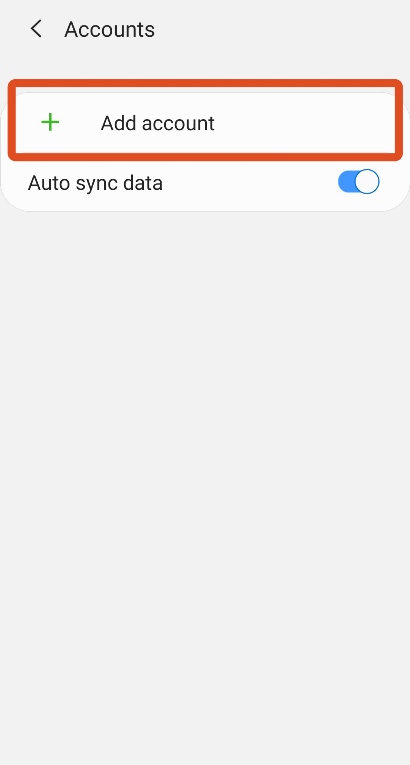
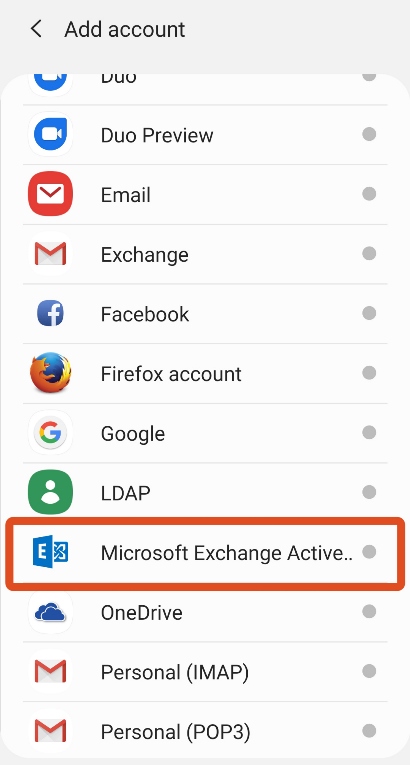
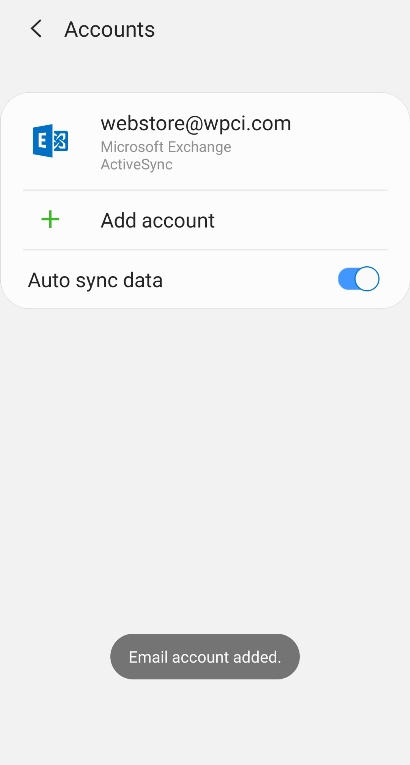
The instructions below will show you how to add your WPCI email account to your mobile device. I would recommend reading through the instructions at least once before attempting to add your WPCI email account to your device.
Note The Following:
Note The Following:
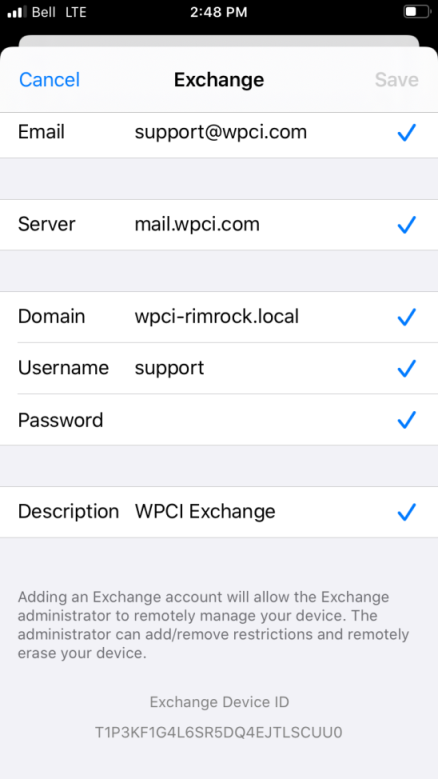
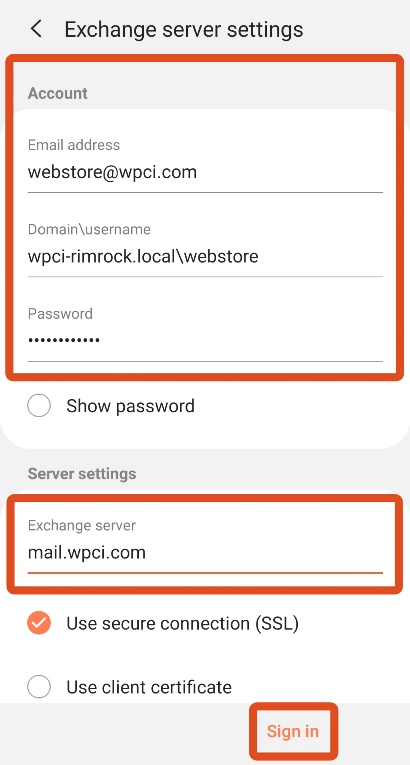
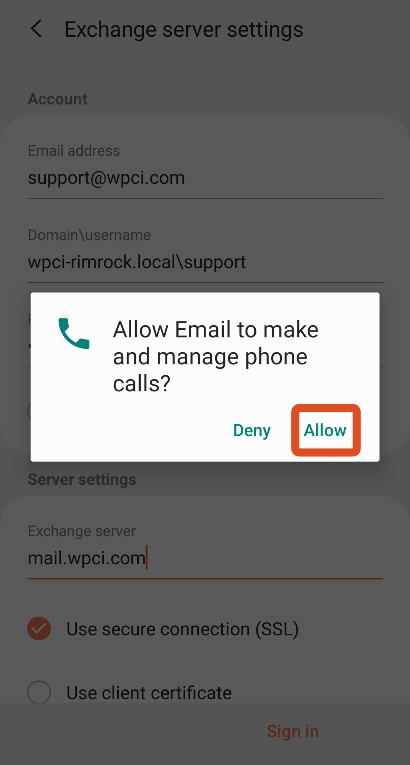
- Domain: wpci-rimrock.local
- Mail Server: mail.wpci.com
- Username: Your username is the portion of your email address before @wpci.com
- Password: Your email password
- Mail Server: mail.wpci.com
- Username: Your username is the portion of your email address before @wpci.com
- Password: Your email password
iOS Device Instructions

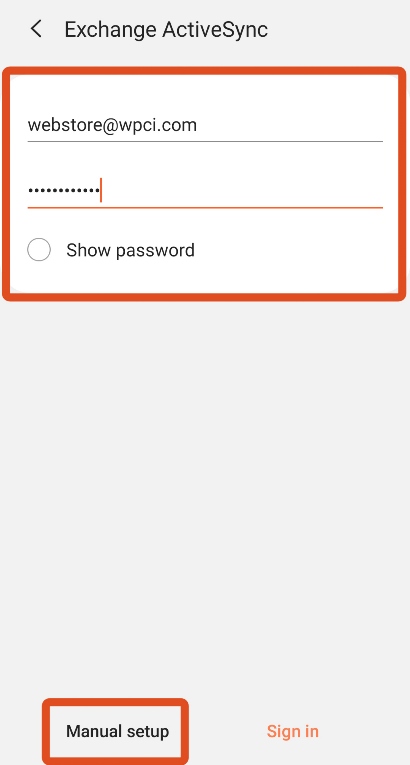
Android Instructions
Please note the following:
- Depending on your Android device, you might not see some of the steps below.
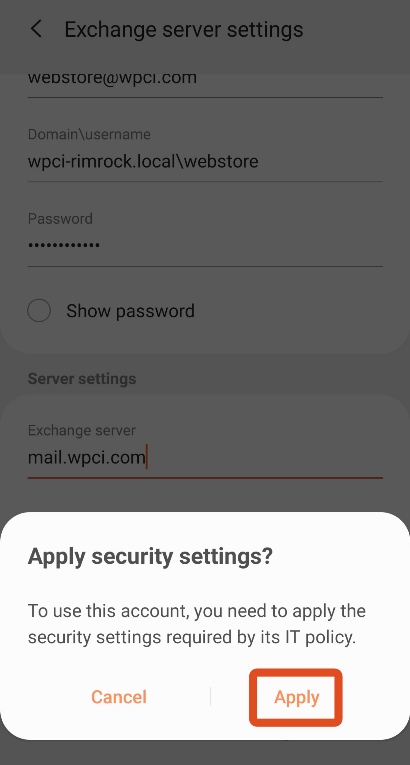
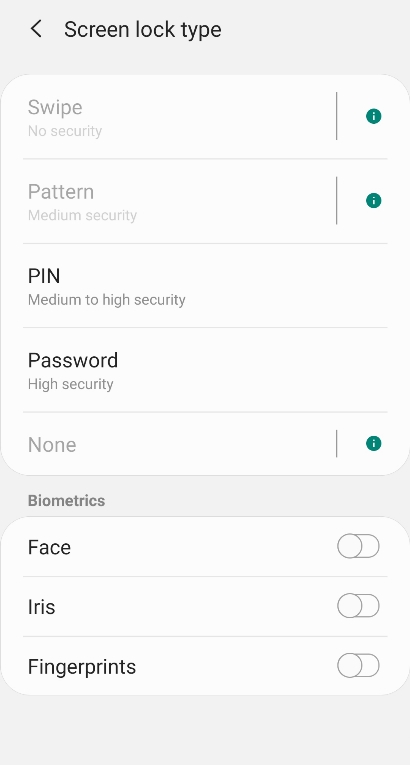
- In order to have a WPCI email account on your device, there has to be some form of login security (PIN, fingerprint, password, face, iris, etc). If you already have a login security format set, then you will not see some of the steps. If you have not, you will be prompted to enter a new login security format.
- In order to have a WPCI email account on your device, there has to be some form of login security (PIN, fingerprint, password, face, iris, etc). If you already have a login security format set, then you will not see some of the steps. If you have not, you will be prompted to enter a new login security format.

The instructions below can be followed to add your WPCI email account to Microsoft Outlook. It is highly recommended that you read through the instructions at least once before attempting to add your WPCI email account to Outlook.
Note The Following:
Domain: wpci-rimrock.local
Mail Server: mail.wpci.com
Username: Your username is the portion of your email address before @wpci.com
Password: Your email password
Mail Server: mail.wpci.com
Username: Your username is the portion of your email address before @wpci.com
Password: Your email password
1. Open Outlook on your computer.
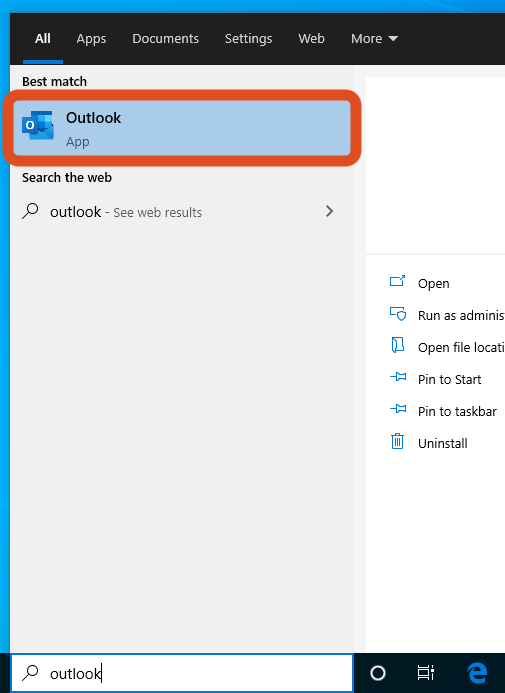
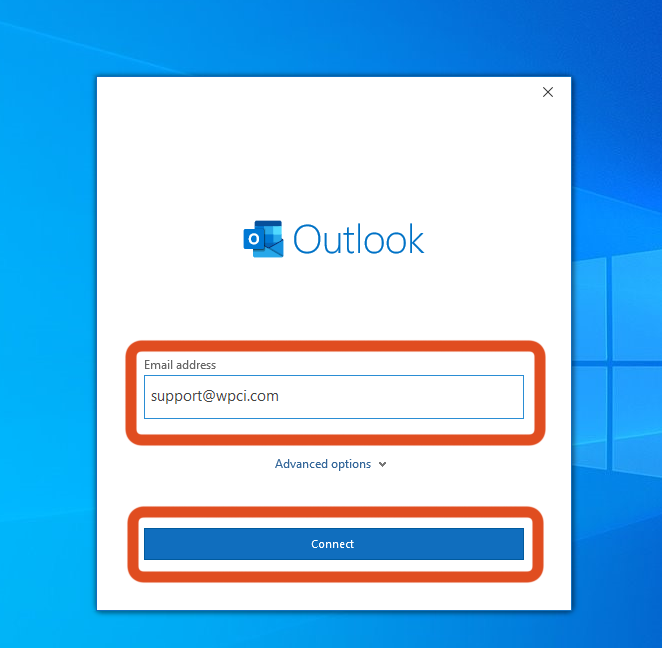
2. Enter your WPCI email address and click on "Connect".
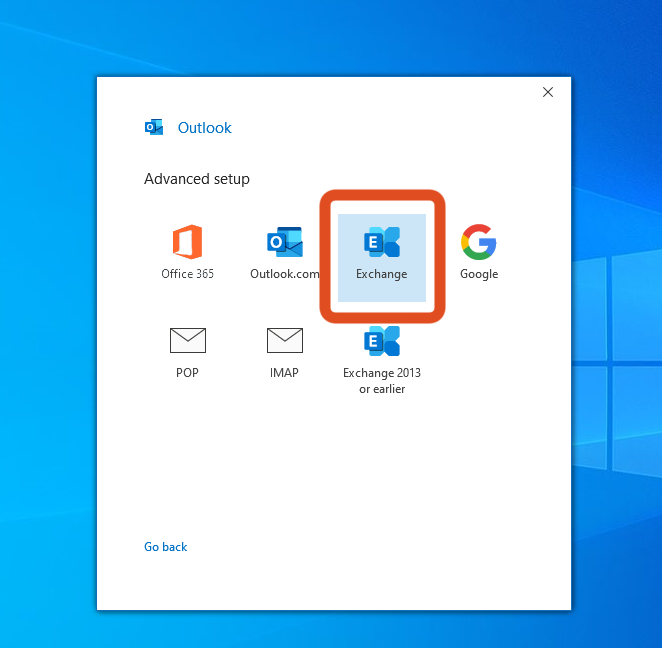
3. Click on "Exchange" (please take note on which Exchange you click on).
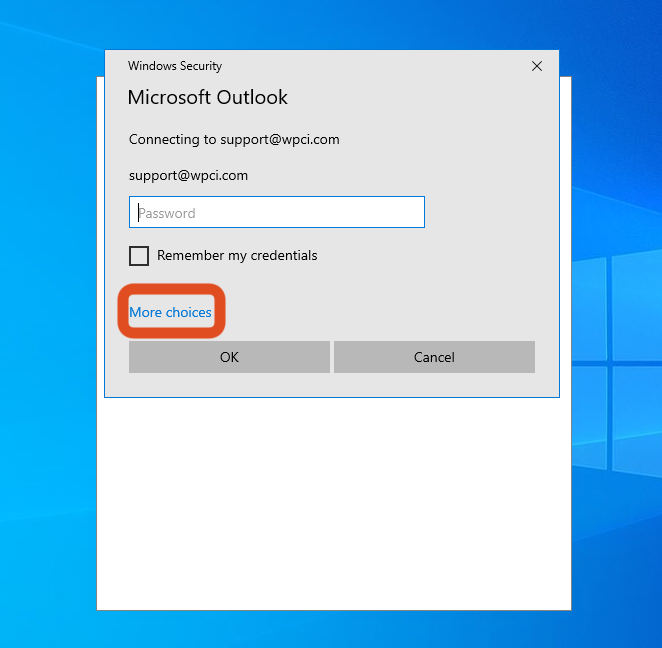
4. On the pop up windows that appears, click on "More choices".
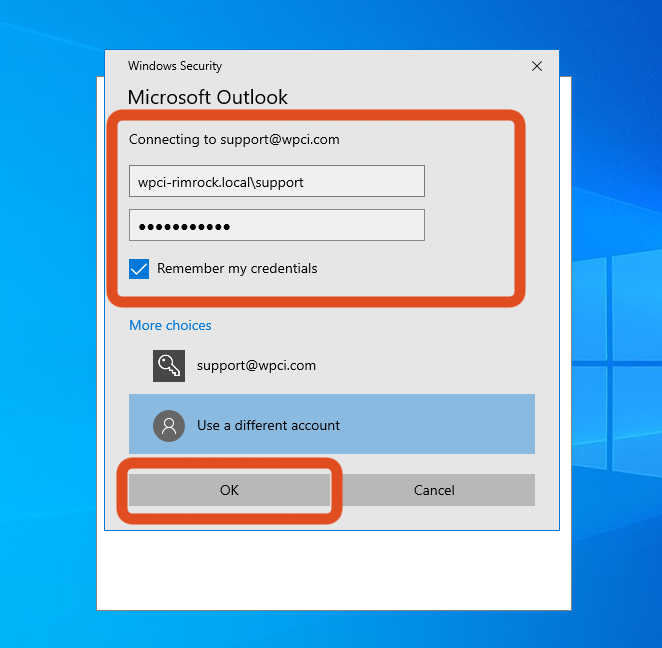
5. Enter your details as follows and then click on "OK" (make sure "Remember my credentials" is ticked").
- DomainUsername: wpci-rimrock.local(back-slash)username (your username is the portion of your email address before @wpci.com)
- Password: Your email password
- Remember my credentials: Should be ticked
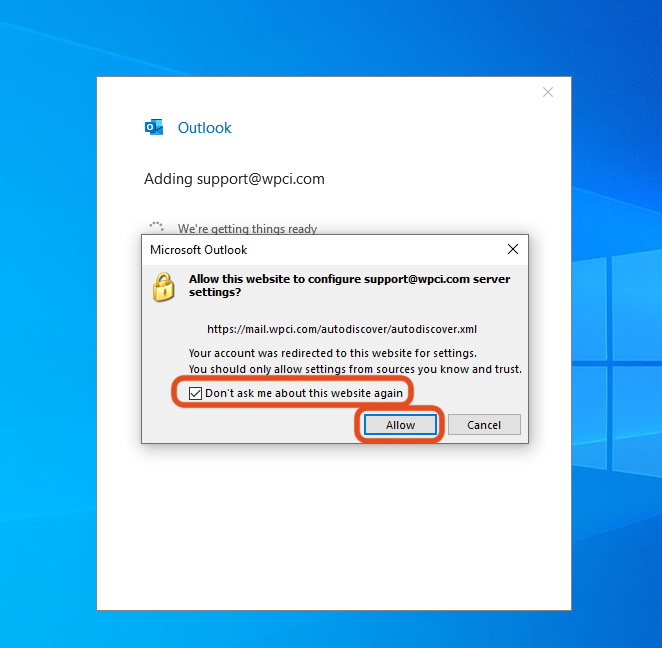
6. On the window that pops up, make sure tick "Don't ask me about this website again" and then click on "Allow". (Depending on your version of Outlook, this window may or may not appear)
7. Click on "Done". Your WPCI email account is now installed on Outlook.

You can follow the instructions below to change your email password.
Bentworth Branch Employees: Please note that when you change your email password, your computer logon password also changes to the new password.
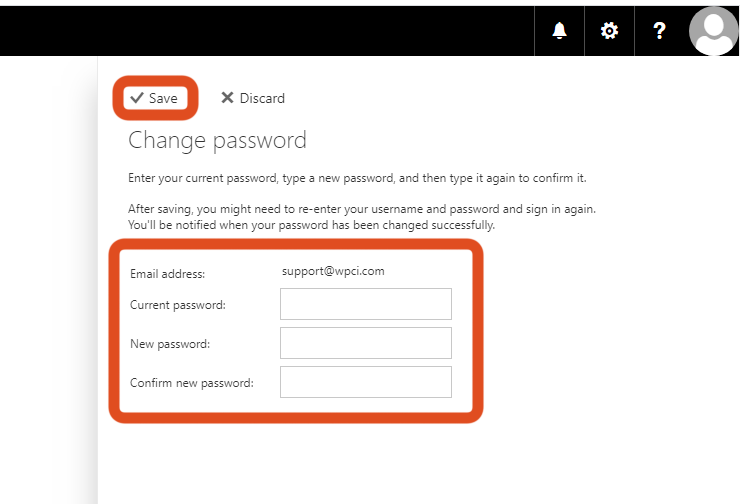
1. Log on to your email account using web Outlook. You can find instructions on how to logon by click on the "WEB ACCESS" tab above.
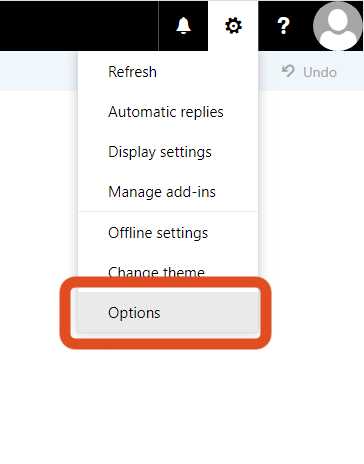
2. Click on the settings cog wheel on the top right corner, and then click on "Options".
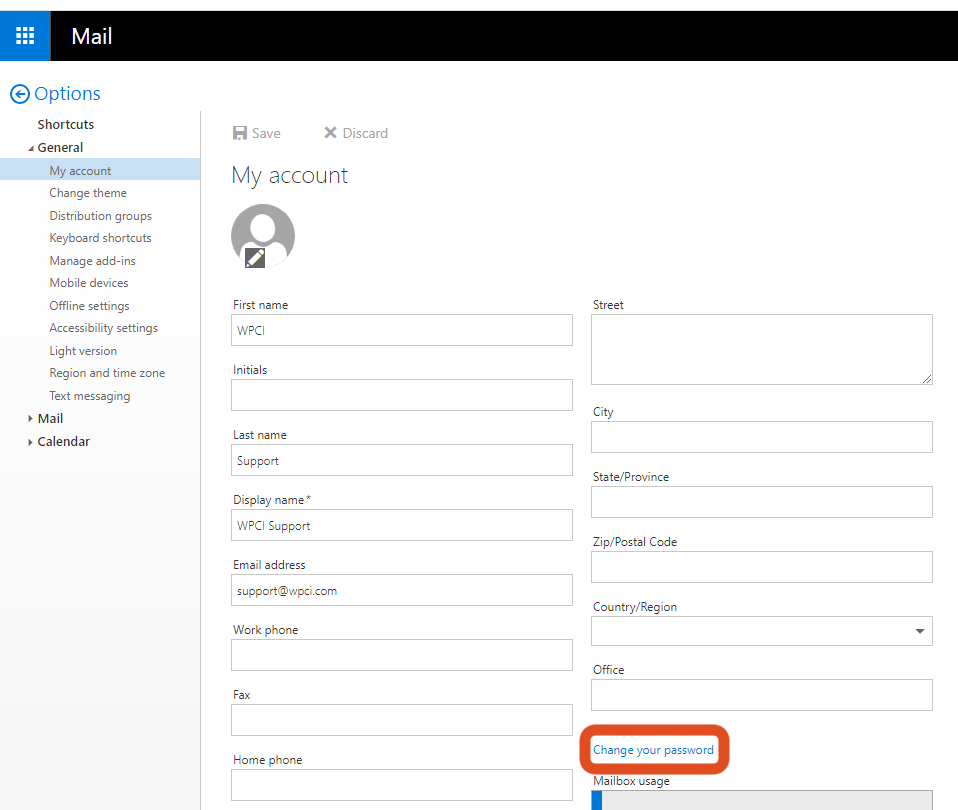
3. Once inside options, go to General > My account. There, click on "Change your password".
4. On the password change page, enter your current password and enter your new password twice and click on "Save". Your password has now been changed.
How To Access HT Vault
For users who have access to our email archiving system, HT Vault, the instructions below can be used to access it.
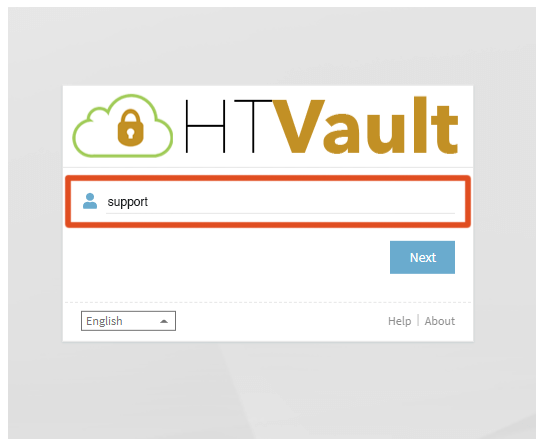
1. Go to https://vault.htcloud.ca/wpci/app/
2. Enter your user name and click on "Next". Your email user name will be the portion of your email address before @wpci.com (eg: the user name is highlighted here: username@wpci.com).
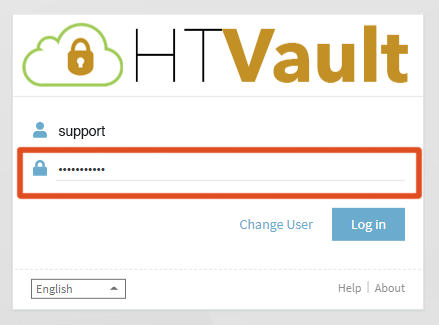
3. Enter your email password (for Bentworth location users, your email password is the same password used to log into your computer) and click on "Log in".
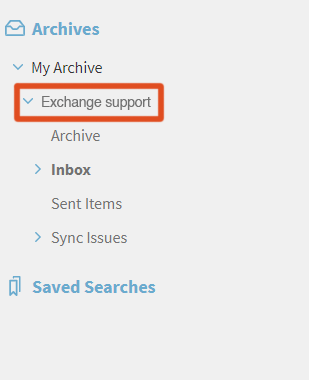
4. Once logged in, click on the blue drop-down arrow near "My Archive".
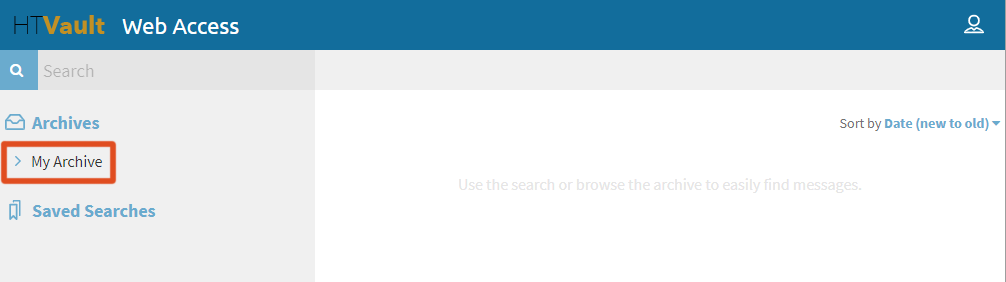
5. Then click on the blue drop-down arrow next to your mailbox archive and then click on the relevant folder you want to explore (eg: inbox, sent, etc). If you had folders inside inbox, click on the blue drop-down arrow next to the inbox folder to find your nested folders.
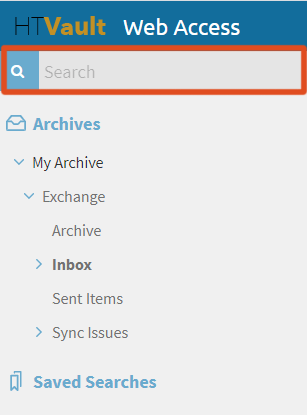
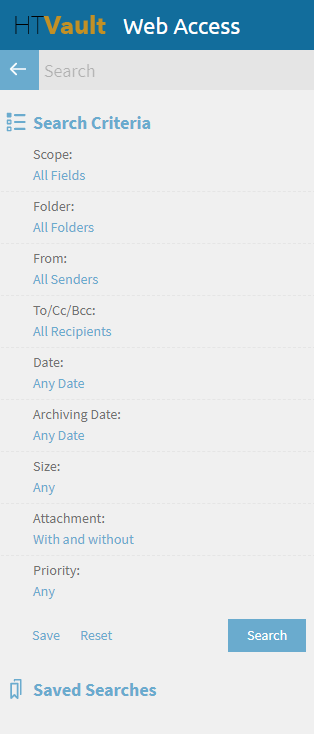
How To Search Inside HT Vault
You can use the search pane on HT vault. There are multiple search filter options available.
How To Restore An Archived Email On HT Vault To Your Current Mailbox
1. Open the email you wise to restore on HT Vault
2. Click on "Restore"

3. On the pop-up window that opens, type the email address you want to restore to (by default, your email address will be filled) and click on "OK".
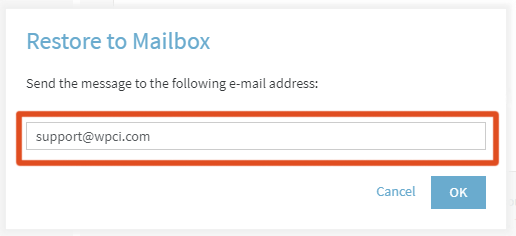
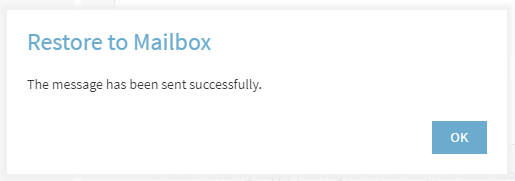
4. You will get a conformation notification that the restore was completed. You can now go to your regular mailbox to see the restored email.
All WPCI email users have access to their own personal personal spam filter, called HT Shield, where they can manage emails that have been caught in the spam filter (eg: release the email to your mailbox because it was caught by accident by the spam filter). Users also can blacklist (block emails) from certain email addresses (user@example.com) or all emails from a certain domain (@example.com). Finally, users can also whitelist (allow emails) from email addresses and domains.
How To Access HT Shield
- Enter your email address and email password and click on "Login"
Manage Your Spam Emails
- If a legitimate email has been flagged and caught by the spam filter, you can release the email to your mailbox by following the instructions below.
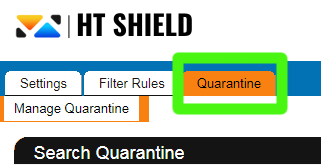
- Click on the "Quarantine" tab.
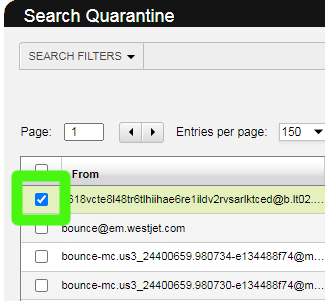
- Select the emails that you wish to modify by placing a tick next to the emails.
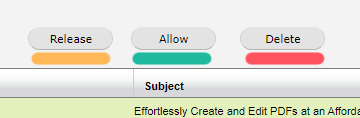
- Finally you can chose an option for what you would like to do to the email/emails you have chosen. You have three options
- 1. Release: This will release the email/emails you have chosen to your mailbox. (Note: this will not prevent future emails from the same sender/senders to be caught by the spam filter)
- 2. Allow: This will release the email/emails you chosen to your mailbox. In addition, this will allow all future email/emails from the sender/senders to be delivered to mailbox without much scrutiny by the spam filter. (Note: only Allow email senders that you trust and know is legitimate sender for your security)
- 3. Delete: This will delete the email/emails from the spam box and will train the spam filter to block future emails of such nature. Once deleted, the email cannot be recovered and the email will not be delivered to your mailbox. (Note: Do this once a week to known spam emails so you can keep your spam box clean and clutter free)
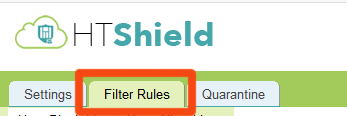
How To Blacklist An Email Address Or Domain
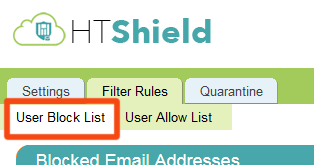
- Click on the "Filter Rules" tab.
- Click on the "User Block List" option.
To Blacklist A Specific Email Address:
When you take this route, all emails coming from a specific email address will be blocked from reaching your mailbox.
- Under the "Blocked Email Addresses" section, click on the "Add..." button.
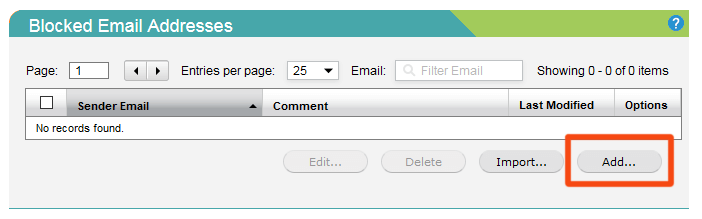
- On the pop-up window that appears, enter the email address you want to block. Optionally you can fill the comment section if you wish so you can identify the reason the email address was blocked on a later date. Once filled, click on "Save".
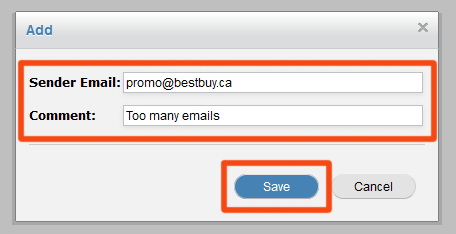
- The email address has now been added to your blacklist and all future emails from this email address, will be blocked to your mailbox.

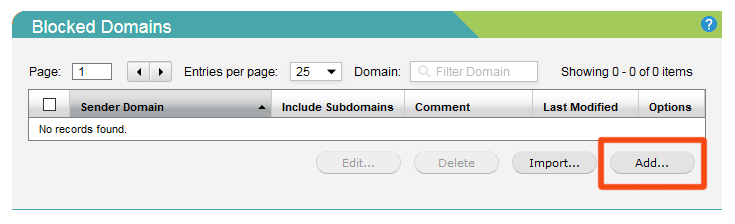
To Blacklist All Emails From A Specific Domain:
When you take this route, all emails coming from a specific domain will be blocked from reaching your mailbox (eg: if the domain @spamexample.com is blocked, then emails from hello@spamexample.com, promo@spamexample.com, etc. will all be blocked).
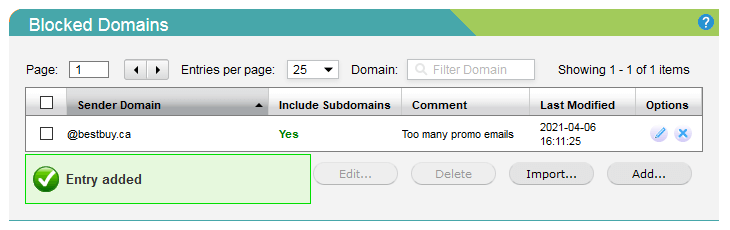
- Under the "Blocked Domains" section, click on the "Add..." button.
- On the pop-up window that appears, enter the domain you would like to block making sure you add the @ symbol before the domain. Tick the "Include Subdomains" option if you wish to block subdomains (subdomains eg: user@promo.spamexample.com, user@connect.spamexample.com, etc.). Optionally you can fill the comment section if you wish, so you can identify the reason the email address was blocked on a later date. Once filled, click on "Save".
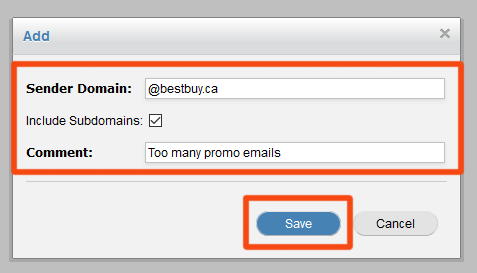
- The domain has now been added to your blacklist and all future emails from this domain (and sub domains if ticked), will be blocked to your mailbox.